반응형
서비스 개발을 하면 필연적으로 배포작업을 거치게 된다. 주로 우리가 접속하는 웹페이지를 위한 Frontend (네이티브 앱을 개발했다면 앱 빌드), 데이터를 처리하고 비즈니스 로직을 수행하는 Backend, 그리고 필요에 따라 다양한 목적의 서버를 여러개 설치하는 경우도 있을것이다. 본 글에선 Frontend와 Backend를 하나의 서버에서 배포하는 방법을 다룬다.
# 예제 프레임워크 : Node.js 기반 프론트엔드 프레임워크, Django
배포
사용자가 URL을 통해 내 서버에 접속하여 웹 서비스를 이용할 수 있도록 하는 것
순서
1. 환경 설정
2. Frontend 배포
3. Backend 배포
4. DNS (도메인 연결)
5. Https 설정
6. proxy_pass 설정
1. 환경 설정
EC2 서버 설정
- 보안그룹에서 Inbound 규칙 편집
- 여기서 80번 포트는 http접속을 위함 (certbot 설정 전, 접속 테스트를 위함 이후 삭제)
- 443번 포트는 https 접속을 위함 (메인으로 사용)
Backend, Frontend clone
- 프로젝트 폴더 클론
git clone [레포 주소]- Backend 설정
sudo apt update
sudo apt -y upgrade
sudo apt install -y python3-pip- Frontend 설정
- 노드 버전매니저, 노드 설치 (특정 버전을 설치할 경우 해당버전 설치)
# Node Version Manager 설치
curl -o- https://raw.githubusercontent.com/nvm-sh/nvm/v0.34.0/install.sh | bash

. ~/.nvm/nvm.sh # NVM 활성화

nvm install node # 최신
nvm install --lts # lts버전
Install Package
- Backend
# backend 폴더에서
pip3 install --upgrade pip
pip3 install -r requirements.txt- Frontend
# frontend 폴더에서
npm i
2. Frontend 배포
빌드
npm run build
Nginx 설치
- Nginx : Advanced Load Balancer, Web Server, & Reverse Proxy
# nginx 설치
sudo apt install -y nginx

# nginx 상태 확인
sudo service nginx status- 뒤에서 nginx 관련 수정, 변경 시 필수적으로 실행
# nginx 재시작
sudo service nginx restart
Frontend 설정 방법
- nginx.conf 파일 경로로 이동, 파일 편집
cd /etc/nginx
sudo vi nginx.conf- nginx.conf 파일을 수정
# 이것을
include /etc/nginx/modules-enabled/*.conf;

# 이걸로 수정
include /etc/nginx/modules-available/*.conf;- 서버 경로를 연결할 경로로 이동, 파일 생성
cd sites-available
sudo vi default- default 파일 수정
server {
        listen 80;

        # 해당 경로로 들어올 경우 root에 있는 index를 보여줌
        # 프론트엔드 폴더 경로에 맞게 설정
        location / {
                root /home/ubuntu/[dist 폴더 경로];
                index index.html;
                try_files $uri $uri/ /index.html;
        }
}- 우선 테스트로 80번 포트를 엶
- 기본적으로 / 경로에는 frontend build된 폴더를 입력
- {host 주소}:80 로 접속하여 확인
3. Backend 배포
Backend 설정 방법
- settings.py allowed_hosts 추가
# settings.py
ALLOWED_HOSTS = [ '*' ] # 전체 설정
ALLOWED_HOSTS = [ '{탄력적 IP}' ] # 예) 54.180.49.81- cors 설정
# settings.py
CORS_ALLOW_ALL_ORIGINS = True # 전체 설정
CORS_ALLOWED_ORIGINS = [
        '{탄력적 IP}', # 예) 'http://15.164.191.46/',
        '{도메인 주소}', # 예) 'https://movietrip.click/',
]- gunicorn3 설정
# 설치
sudo apt install gunicorn3

# gunicorn 실행
gunicorn3 --bind 0.0.0.0:8000 server.wsgi:application # --daemon (background에서 실행)
# 초기값: 0.0.0.0(전부 다 열기)
# HTTPS 설정시: 127.0.0.1 (nginx 통해 proxy_pass 설정할 것임)
DNS (도메인 연결)
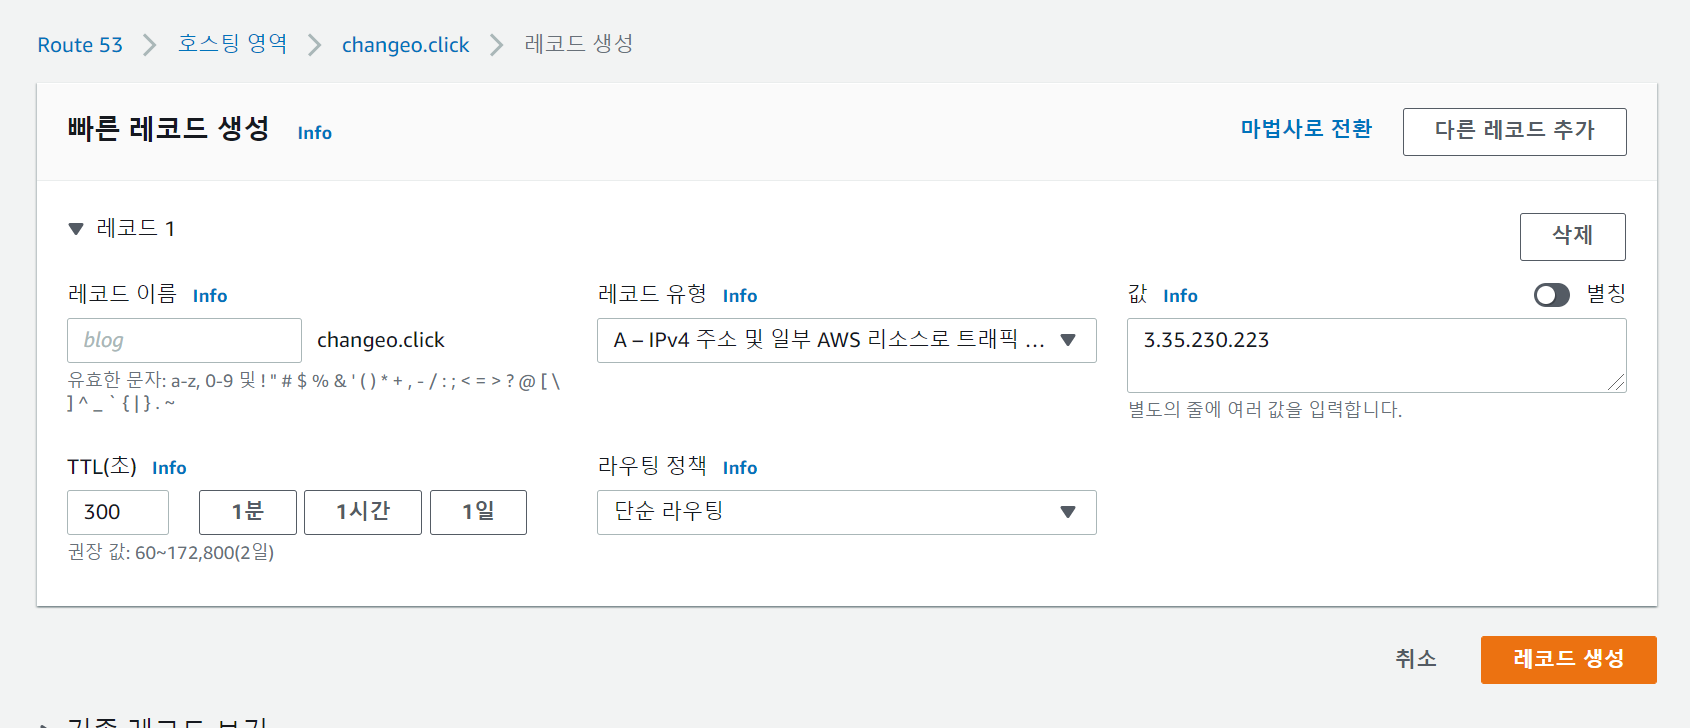
- Route53
- 레코드 생성
- 레코드 유형 A
- 값 (EC2 IP 주소)
- default 파일 수정
server {
        listen 80;
        server_name {서버IP주소} {도메인주소};

        location / {
                root /home/ubuntu/[dist 폴더 경로];
                index index.html;
                try_files $uri $uri/ /index.html;
        }

        # django에서 static 파일 사용시 추가
        location /static/ {
                root /home/ubuntu/{django 폴더}/staticfiles/;
        }
}- 예시
server {
        listen 80;
        server_name 54.180.49.81 pickyourtaste.click;
        location / {
                root /home/ubuntu/workspace/final-pjt/final-pjt-front/dist;
                index index.html;
                try_files $uri $uri/ /index.html;
        }
}- allowed hosts 수정
# settings.py
ALLOWED_HOSTS = [ '*' ] # 전체 설정
ALLOWED_HOSTS = [
    '{탄력적 IP}' # 예) 54.180.49.81
    '{도메인주소}' # 예) pickyourtaste.click
]
5. Https 설정
- core 설치 (EC2에 설치되어있음)
sudo snap install core; sudo snap refresh core- certbot 설치
sudo snap install --classic certbot- 심볼릭 링크
sudo ln -s /snap/bin/certbot /usr/bin/certbot- 자동 설정
sudo certbot --nginx- 이메일 입력
- 도메인 설정을 받은 이메일 주소 입력
- 동의 후 도메인 선택
- https 주소로 요청 후 확인
6. proxy_pass 설정
- default 파일 수정
server {
        server_name ...
        location / {
                ...
        }
        location /{요청 url 주소}/ { # 포트 번호 뒤 서버 url 주소
                 proxy_pass http://127.0.0.1:8000/{백엔드 url 주소}/;
        }
...
}- 예시
server {
        server_name ...
        location / {
                ...
        }
                location /admin/ {
                 proxy_pass http://127.0.0.1:8000/admin/;
        }
        location /api/v1/accounts/ {
                 proxy_pass http://127.0.0.1:8000/api/v1/accounts/;
        }
        location /api/v1/baskets/ {
                 proxy_pass http://127.0.0.1:8000/api/v1/baskets/;
        }
        location /api/v1/movies/ {
                 proxy_pass http://127.0.0.1:8000/api/v1/movies/;
        }
...
}
배포 자동화(Jenkins, Docker 활용)는 추후 다룰 예정
반응형